AWS EC2部署Nexus笔记
记录一下基于AWS EC2环境部署Sonatype Nexus的过程笔记
创建EC2并配置Key等内容直接跳过, 直接登录shell开始.
部署流程
执行
yum update先对系统进行升级执行
mkdir /data创建挂载目录执行
fdisk /dev/nvme1n1对新挂载磁盘进行分区操作执行
partprobe同步磁盘数据执行
mkfs.ext4 /dev/nvme1n1p1对新创建的磁盘进行格式化, 分区格式为ext4执行
blkid提取新分区的UUID修改
/etc/fstab文件, 添加一行1
UUID="f0c0121a-9ed4-44a2-a395-151c52f2b0a7" /data ext4 defaults,noatime 1 1
执行
mount -a挂载数据盘执行
useradd -b /data -m nexus创建nexus用户按照官方手册要求, 修改
nexus用户最大文件限制1
echo 'nexus - nofile 65536' >> /etc/security/limits.conf
创建Nexus服务启动项, 参照官方手册
1
2
3
4
5
6
7
8
9
10
11
12
13
14
15
16
17
# 写入启动项内容
cat << EOF > /usr/lib/systemd/system/nexus.service
[Unit]
Description=Nexus OSS Service
After=network.target
[Service]
Type=forking
LimitNOFILE=65536
ExecStart=/data/nexus/bin/nexus start
ExecStop=/data/nexus/bin/nexus stop
User=nexus
Restart=on-abort
[Install]
WantedBy=multi-user.target
EOF创建压缩包备份目录, 并上传压缩包
1
2
3
4
5
6
# 创建目录
mkdir /data/packages
# 上传jdk压缩包
...
# 上传nexus压缩包
...解压缩并配置好JDK环境
1
2
3
4
5
6
7
8
9
10
11
12
13
14
15
16
17解压缩
tar zxf jdk-8u281-linux-x64.tar.gz
移动jdk文件夹
mv jdk1.8.0_281/ /data/
创建软连接
ln -s /data/jdk1.8.0_281 /data/jdk
添加JDK环境变量
cat << EOF >> /etc/profile
export JAVA_HOME=/data/jdk
export CLASSPATH=.:${JAVA_HOME}/lib
export PATH=$PATH:${JAVA_HOME}/bin
EOF
重新载入环境变量
source /etc/profile
检查java环境是否正确
java -version解压缩并配置好Nexus, 官方手册中有注意事项
1
2
3
4
5
6
7
8
9
10
11
12
13
14
15
16
17
18解压缩
tar zxf nexus-3.30.0-01-unix.tar.gz
移动Nexus仓库数据文件夹
mv sonatype-work/ /data/
移动可执行程序等
mv nexus-3.30.0-01/* /data/nexus/
mv nexus-3.30.0-01/..install4j/ /data/nexus/
rmdir nexus-3.30.0-01
变更文件属主
chown nexus:nexus -R /data/nexus/
chown nexus:nexus -R /data/sonatype-work/
按照官方手册
https://help.sonatype.com/repomanager3/installation/system-requirements#SystemRequirements-Java
中注意事项内容, 需要修改启动脚本内容, 在/data/nexus/bin/nexus文件的第14行
13 # Uncomment the following line to override the JVM search sequence
14 INSTALL4J_JAVA_HOME_OVERRIDE=/data/jdk
取消14行的注释, 并按照上述, 添加手工安装JDK的软连接目录启动Nexus服务, 并打开开机自动启动功能
1
2
3
4
# 启动服务
systemctl start nexus
# 开启自动启动功能
systemctl enable nexus等待服务正常启动后, 登录页面:
http://IP:8081, 按照wizard提取admin的初始密码1
2
3# 获取密码
cat /data/sonatype-work/nexus3/admin.password
# 注意: 该文件会在修改admin密码后直接被删除, 请勿保存密码在该文件中按照官方的CPU推荐, 可修改实例大小:
最低要求 推荐大小 4 Cores 8+ Cores 按照官方的内存推荐信息如下:
The requirements assume there are no other significant memory hungry processes running on the same host.
JVM Heap JVM Direct Host Physical/RAM Minimum ( default ) 2703MB 2703MB 8GB Maximum 4GB (host physical/RAM * 2/3) - JVM max heap no limit General Memory Guidelines
- minimum physical/RAM memory on the host 8GB
- minimum heap ( -Xms ) must equal set maximum heap ( -Xmx )
- minimum heap size 2703MB
- maximum heap size <= 4GB
- minimum direct memory ( -XX:MaxDirectMemorySize ) size 2703MB
- minimum unallocated host physical/RAM memory should be no less than 1/3 of total physical RAM to allow for virtual memory swap
- max heap + max direct memory <= host physical/RAM * 2/3
Instance Memory Sizing Profiles
These profiles help gauge the typical physical memory requirements needed for a dedicated server host running repository manager. Due to the inherent complexities of use cases, one size does not fit all and this should only be interpreted as a guideline.
Profile Use Case Physical/RAM Memory small, personalrepositories < 20 total blobstore size < 20GB single repository format type 8GB minimum medium, teamrepositories < 50 total blobstore size < 200GB a few repository formats 16GB large, enterpriserepositories > 50 total blobstore size > 200GB diverse set of repository formats 32GB+ 按照官方手册修改好实例大小后, 继续参考官方手册中的说明, 修改配置文件
Physical/RAM Memory Example Maximum Memory Configuration 8GB -Xms2703M -Xmx2703M -XX:MaxDirectMemorySize=2703M12GB -Xms4G -Xmx4G -XX:MaxDirectMemorySize=4014M16GB -Xms4G -Xmx4G -XX:MaxDirectMemorySize=6717M32GB -Xms6G -Xmx6G -XX:MaxDirectMemorySize=15530M64GB -Xms8G -Xmx8G-XX:+UseG1GC-XX:MaxDirectMemorySize=35158M1
2
3
4
5
6
7
8
9
10
11
12
13
14
15# 切换到nexus用户
su - nexus
# 备份原配置文件
cp bin/nexus.vmoptions bin/nexus.vmoptions.bak
# 按照实际情况修改配置
BEFORE:
-Xms2703m
-Xmx2703m
-XX:MaxDirectMemorySize=2703m
AFTER:
-Xms4G
-Xmx4G
-XX:MaxDirectMemorySize=6717m修改EC2的默认DNS, 以解析内网域名
1
2
3
4
5
6
7
8
9
10教程原文:
https://aws.amazon.com/cn/premiumsupport/knowledge-center/ec2-static-dns-ubuntu-debian/
添加额外DNS内容
cp /etc/dhcp/dhclient.conf /etc/dhcp/dhclient.conf.bak
echo "supersede domain-name-servers 10.1.0.1;" >> /etc/dhcp/dhclient.conf
修改eth0的默认配置
CFG="/etc/sysconfig/network-scripts/ifcfg-eth0"
cp ${CFG} ${CFG}.bak
if grep "PEERDNS" ${CFG};then sed -E -i "s/^#?( ?)*PEERDNS=.*$/PEERDNS=yes/" ${CFG}; else echo "PEERDNS=yes" >> ${CFG};fi如果需要挂载其他目录, 请参考手册
Nexus Repository stores multiple kinds of data, with two primary storage requirements:
Embedded data (OrientDB, Elastic Search) requires very responsive, fast storage, ideally local disk
Blob storage (component binaries), which requires moderately responsive, high-capacity storage
File system selection should be made bearing both of these in mind.
File System Embedded data Blob Stores Comment XFS Supported Supported This is a commonly used file system for locally attached storage. NFS v4 Supported 1 Supported Most common protocol for network attached storage among Nexus Repository deployments. Amazon EBS Supported Supported EBS is a viable choice for both embedded data and binary storage. Amazon EFS Unsupported Not Recommended EFS isn't sufficiently responsive for embedded data, and in our testing handles too few requests per second. Amazon S3 N/A Supported S3 semantics aren't applicable for embedded data, but S3 is popular for binary storage. SMB, CIFS Unsupported Supported Problems are common with SMB or CIFS-mounted devices for embedded data. Azure Files Unsupported Supported Issues with file handles have been observed when accessing embedded data over SMB. S3-Compatible Unsupported Some S3-compatible object stores do not support all the features required by Nexus Repository. NFS v3 Unsupported Numerous customers have experienced inadequate performance with NFS v3. GlusterFS Unsupported Split-brain problems and slow performance are common. FUSE Unsupported FUSE based user-space filesystems are known to be unreliable for Nexus Repository.
修改默认HTTP端口 官方手册
1
2
3
4
5
6
7
8
9
10
11
12# 切换到nexus用户
su - nexus
# 配置文件
CFG="/data/sonatype-work/nexus3/etc/nexus.properties"
# 备份默认配置
cp ${CFG} ${CFG}.bak
# 修改默认端口为80
sed -E -i "s/^#?( ?)*application-port=.*$/application-port=80/" ${CFG}
# 退回root用户
exit
# 重启nexus服务
systemctl restart nexus上述方法不适用以非
root用户启动的方式,因为内核设定不允许普通用户绑定1024以下端口, 因此采用nginx的TCP转发方式实现1
2
3
4
5
6
7
8
9
10
11
12
13
14
15
16
17
18
19
20
21
22
23
24
25
26
27
28
29
30
31
32
33
34
35
36
37
38
39
40
41
42
43
44
45
46
47
48
49
50
51
52安装nginx
yum install -y nginx
Amazon Linux 2 官方提供了安装nginx方法
sudo amazon-linux-extras install nginx1 -y
备份默认文件
mv /etc/nginx/nginx.conf /etc/nginx/nginx.conf.bak
创建新配置文件
cat << EOF > /etc/nginx/nginx.conf
user nginx;
worker_processes auto;
error_log /var/log/nginx/error.log;
pid /run/nginx.pid;
include /usr/share/nginx/modules/*.conf;
events {
worker_connections 1024;
}
stream {
log_format proxy '$remote_addr [$time_local] '
'$protocol $status $bytes_sent $bytes_received '
'$session_time "$upstream_addr" '
'"$upstream_bytes_sent" "$upstream_bytes_received" "$upstream_connect_time"';
access_log /var/log/nginx/tcp-access.log proxy ;
open_log_file_cache off;
include tcp/*.conf;
}
EOF
创建TCP转发配置文件夹
mkdir -p /etc/nginx/tcp
写入配置文件
cat << EOF > /etc/nginx/tcp/80_8081.conf
upstream 80_8081 {
server 127.0.0.1:8081;
}
server {
listen 80;
proxy_connect_timeout 8s;
proxy_timeout 24h;
proxy_pass 80_8081;
}
EOF
检查配置
nginx -t
启动nginx
systemctl start nginx
设置开机自启动
systemctl enable nginx
附配置通过的邮件配置: 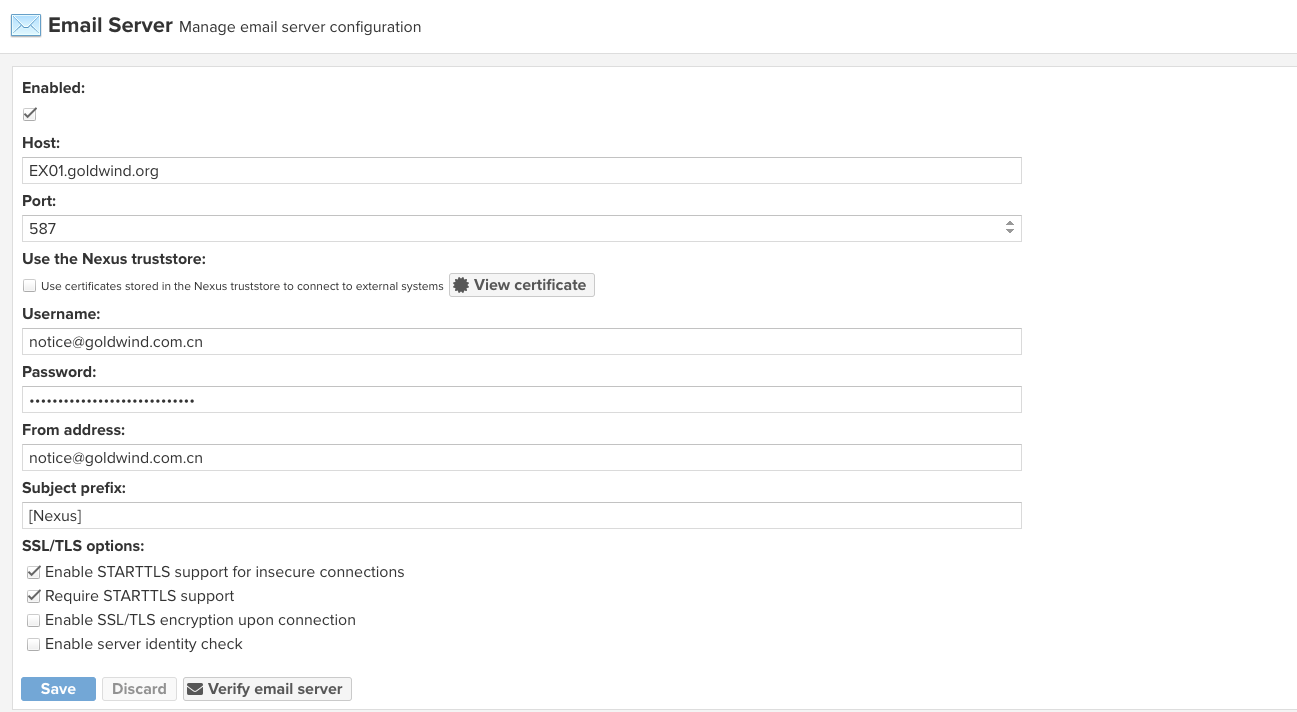
NFSv4 can be used for the work directory in small lightly loaded installations, but we have found that it does not provide sufficient performance for large heavily loaded instances. For those it should be avoided.↩︎