之前在使用Wordpress或Typecho的时候,
那些博客框架都支持对指定文章进行加密, 现在换用了Hexo,
发现貌似并不支持这个操作, 因此去官方网站上找了找插件,
有一个hexo-blog-encrypt插件实现了这个功能,
因此记录一下安装过程
参考文档:
Hexo博客文章加密
| IT范儿
hexo-blog-encrypt/ReadMe.zh.md
at master · D0n9X1n/hexo-blog-encrypt
感谢上面两位老哥的共享精神!
安装与配置
1 npm install --save hexo-blog-encrypt
修改_config.yml, 增加配置
1 2 3 4 5 6 7 8 9 10 encrypt: silent: true abstract: 加密文章哦~请输入密码查看 message: 请输入文章查看密码 tags: - {name: tagA , password: 'Password1' } - {name: tagB , password: 'Password2' } wrong_pass_message: 抱歉, 这个密码对哈, 请再试试或者联系管理员 wrong_hash_message: 抱歉, 这个文章不能被校验, 不过您还是能看看解密后的内容
上面的配置指定了全局加密信息,
即一篇博客如果有tagA的标签, 那么就会被加密,
并且密码为Password1, 以此类推, 避免每篇文章都手工加密
配置项
说明
silent
设置为true会隐藏在生成静态页面时的提示信息:
INFO hexo-blog-encrypt: encrypting "Hexo-加密样例" based on the password configured in Front-matter with theme: default.
abstract
表示在预览的时候展示的文字说明信息
message
表示在进入文章的时候密码提示框的提示信息
wrong_pass_message
表示密码输入错误的提示信息
wrong_hash_message
表示文章校验失败的提示信息
个性加密
创建一篇样例文章Hexo-加密样例
1
2
3
4
5
6
7
8
9
10
11
12
13
14
15
16
17
18
19
--- lang: zh title: Hexo-加密样例 categories: - [个人, 博客]tags: - Hexo - 博客 - 加密 - 样例mathjax: false date: 2022-05-25 17:15:43 password: hello message: '测试加密样例, 密码: hello' --- 这是一个加密样例, 不输入密码的时候是看不到这行信息的哦~
其中Yaml Front Matter中针对本篇文章进行了自定义信息,
支持全部配置文件中的定义类别
解决TOC消失
按照官方文档中对于TOC问题的解释 以及仔细研究了博主的说明 ,
总结一下, 针对于NexT主题,
需要修改blog/node_modules/hexo-theme-next/layout/_macro/sidebar.njk文件,
在{%- if display_toc %}与{%- endif %}块之间插入对加密的判断,
原始内容如下:
1
2
3
4
{%- if display_toc %} {%- set toc = toc (page.content , {class : 'nav' , list_number : page.toc .number , max_depth : page.toc .max_depth }) %} {%- set display_toc = toc.length > 1 and display_toc %} {%- endif %}
修改后的结果:
1
2
3
4
5
6
7
8
9
10
11
{%- if display_toc %} <!-- Add encrypt rules --> {%- if (page.encrypt ) %} {%- set toc = toc (page.origin , {class : 'nav' , list_number : page.toc .number , max_depth : page.toc .max_depth }) %} {%- set display_toc = toc.length > 1 and display_toc %} {%- else %} {%- set toc = toc (page.content , {class : 'nav' , list_number : page.toc .number , max_depth : page.toc .max_depth }) %} {%- set display_toc = toc.length > 1 and display_toc %} {%- endif %} <!-- End --> {%- endif %}
解决解密前TOC显示
按照博主的优化方案 ,
通过对blog/node_modules/hexo-theme-next/layout/_macro/sidebar.njk文件中sidebar-panel-container这段代码块进行修改,
实现隐藏DIV来曲线救国, 原始块如下:
1
2
3
4
5
6
7
8
9
10
11
12
13
14
15
<div class ="sidebar-panel-container" > <!--noindex--> <div class ="post-toc-wrap sidebar-panel" > {%- if display_toc %} <div class ="post-toc animated" > {{ toc }}</div > {%- endif %} </div > <!--/noindex--> <div class ="site-overview-wrap sidebar-panel" > {{ partial('_partials/sidebar/site-overview.njk', {}, {cache: theme.cache.enable}) }} {{- next_inject('sidebar') }} </div > </div>
修改后的结果:
1
2
3
4
5
6
7
8
9
10
11
12
13
14
15
16
17
18
19
20
21
22
23
24
25
<div class ="sidebar-panel-container" > <!--noindex--> <div class ="post-toc-wrap sidebar-panel" > {%- if (page.encrypt) %} <div id ="toc-div" style ="display:none" > {%- else %} <div id ="toc-div" > {%- endif %} {%- if display_toc %} <div class ="post-toc animated" > {{ toc }}</div > {%- endif %} </div > </div > <div class ="site-overview-wrap sidebar-panel" > {{ partial('_partials/sidebar/site-overview.njk', {}, {cache: theme.cache.enable}) }} {{- next_inject('sidebar') }} </div > </div>
实现逻辑就是通过判断加密状态, 如果加密的情况下,
就在展示toc的div外面再封装一层属性style="display:none"的div用于隐藏TOC,
不过博主也特别提示, 这个属于障眼法,
通过F12进入开发者模式是可以看到标题的,
不过也算目前比较完美的解决方案了
成果
TOC结果展示
为加密文档添加锁🔒
根据博主的文章 在文件blog/node_modules/hexo-theme-next/layout/_macro/post.njk中搜索关键字post-meta,
发现了如下信息:
1
2
3
4
5
6
7
<div class ="post-meta-container" > {{ partial ('_partials/post/post-meta.njk' ) }} {%- if post.description and (not theme.excerpt_description or not is_index) %} <div class ="post-description" >{{ post.description }}</div> {%- endif %} </div>
主要的meta内容在_partials/post/post-meta.njk中定义,
打开该文件
1
2
3
4
5
6
7
8
9
10
11
12
13
14
15
16
17
18
19
20
21
22
23
24
25
26
27
28
29
30
31
32
33
34
35
36
37
38
39
40
<div class ="post-meta" > {%- set date_diff = date (post.date ) != date (post.updated ) %} {%- set time_diff = time (post.date ) != time (post.updated ) %} {%- if theme.post_meta .created_at %} ... {%- endif %} {%- if theme.post_meta .updated_at .enable and (not theme.post_meta .updated_at .another_day or date_diff or not theme.post_meta .created_at ) %} ... {%- endif %} {%- if post.categories and post.categories .length and theme.post_meta .categories %} ... {%- endif %} {# LeanCloud PageView #} {%- if theme.leancloud_visitors .enable %} ... {%- endif %} {%- if theme.firestore .enable %} ... {%- endif %} {%- if not is_index and theme.busuanzi_count .enable and theme.busuanzi_count .post_views %} ... {%- endif %} {{- next_inject ('postMeta' ) }} {%- if theme.symbols_count_time .separated_meta and config.symbols_count_time .symbols and config.symbols_count_time .time %} ... {%- endif %} {%- if config.symbols_count_time .time %} ... {%- endif %} </div>
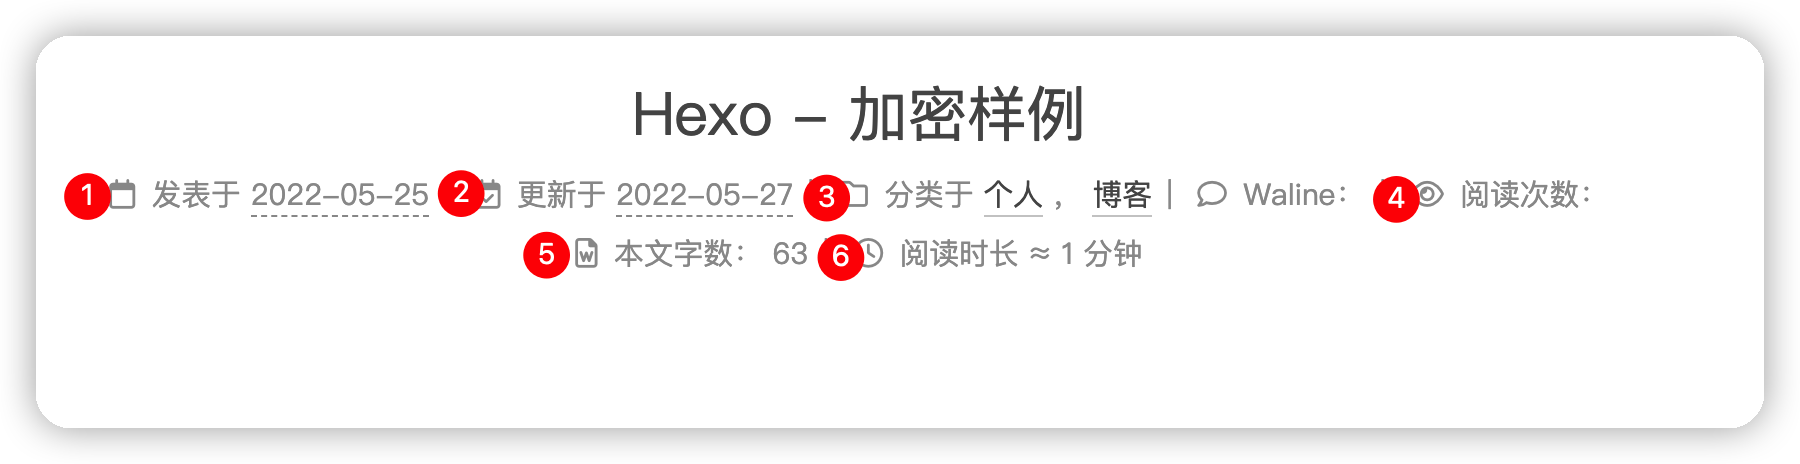
上面JS特征对应到页面中:
Post的元数据
可以看到我开启的功能都是有相应的{%- if xxx %}条件对应的,
那么只需要在发表于之前, 针对加密的文章,
添加一个🔒[加密]的状态即可, 因此修改代码
1
2
3
4
5
6
7
8
9
10
11
12
13
14
15
16
17
18
19
20
21
22
23
24
25
26
27
28
29
30
31
32
33
34
35
36
37
38
39
40
41
<div class ="post-meta" > {%- set date_diff = date (post.date ) != date (post.updated ) %} {%- set time_diff = time (post.date ) != time (post.updated ) %} {# Add for encrypt post articles with 'password' in Front Matter #} {%- if post.password %} <span class ="post-meta-item" > <span class ="post-meta-item-icon" > <i class ="fas fa-lock" > </i > </span > <span class ="post-meta-item-text" > <font color ='#FD7E13' > [加密]</font > </span > </span> {%- else %} {# Add for encrypt post articles with tag configured in `_config.yml` #} {%- if (config.encrypt ) and (config.encrypt .tags ) %} {%- for ctag in config.encrypt .tags %} {%- if post.tags %} {%- for ptag in post.tags .toArray () %} {%- if (ctag.name == ptag.name ) %} <span class ="post-meta-item" > <span class ="post-meta-item-icon" > <i class ="fas fa-lock" > </i > </span > <span class ="post-meta-item-text" > <font color ='#FD7E13' > [加密]</font > </span > </span> {%- endif %} {%- endfor %} {%- endif %} {%- endfor %} {%- endif %} {%- endif %} {%- if theme.post_meta .created_at %} ...
感谢原博主@Leafney
成果展示
加密文章带🔒标识