群晖部署Gitea+Drone手册

记录在群晖DS920上部署Gitea+Drone过程

部署过程

Gitea部署

轻量级CI/CD自动构建平台Gitea+Drone保姆级实践教程_幸福指北的博客-CSDN博客_drone gitea

Installation with Docker - Docs

功能对比

Gitea compared to other Git hosting options - Docs

General Features

Feature Gitea Gogs GitHub EE GitLab CE GitLab EE BitBucket RhodeCode CE
Open source and free
Low RAM/ CPU usage
Multiple database support
Multiple OS support
Easy upgrades
Telemetry ?
Third-party render tool support ?
WebAuthn (2FA) ?
Extensive API
Built-in Package/Container Registry
Sync commits to an external repo (push mirror)
Sync commits from an external repo (pull mirror) ?
Light and Dark Theme ?
Custom Theme Support
Markdown support
CSV support ?
‘GitHub / GitLab pages’
Repo-specific wiki (as a repo itself) /
Deploy Tokens
Repository Tokens with write rights
RSS Feeds
Built-in CI/CD
Subgroups: groups within groups
Interaction with other instances /
Mermaid diagrams in Markdown
Math syntax in Markdown

Code management

Feature Gitea Gogs GitHub EE GitLab CE GitLab EE BitBucket RhodeCode CE
Repository topics
Repository code search
Global code search
Git LFS 2.0
Group Milestones
Granular user roles (Code, Issues, Wiki, …)
Verified Committer ?
GPG Signed Commits
SSH Signed Commits ? ?
Reject unsigned commits
Migrating repos from other services
Repository Activity page
Branch manager
Create new branches
Web code editor
Commit graph
Template Repositories
Git Blame
Visual comparison of image changes ? ? ? ?

Issue Tracker

Feature Gitea Gogs GitHub EE GitLab CE GitLab EE BitBucket RhodeCode CE
Issue tracker /
Issue templates
Labels
Time tracking
Multiple assignees for issues
Related issues
Confidential issues
Comment reactions
Lock Discussion
Batch issue handling
Issue Boards (Kanban) /
Create branch from issue
Convert comment to new issue
Issue search
Global issue search /
Issue dependency
Create issue via email
Service Desk

Pull/Merge requests

Feature Gitea Gogs GitHub EE GitLab CE GitLab EE BitBucket RhodeCode CE
Pull/Merge requests
Squash merging
Rebase merging
Pull/Merge request inline comments
Pull/Merge request approval
Merge conflict resolution
Restrict push and merge access to certain users
Revert specific commits
Pull/Merge requests templates
Cherry-picking changes
Download Patch /

3rd-party integrations

Feature Gitea Gogs GitHub EE GitLab CE GitLab EE BitBucket RhodeCode CE
Webhooks
Git Hooks
AD / LDAP integration
Multiple LDAP / AD server support
LDAP user synchronization
SAML 2.0 service provider
OpenID Connect support ?
OAuth 2.0 integration (external authorization) ?
Act as OAuth 2.0 provider
Two factor authentication (2FA)
Integration with the most common services /
Incorporate external CI/CD

部署记录

首先参考了官方中文手册1, 并按照手册提供的内容, 编写了docker-compose.yml文件

1
2
3
4
5
6
7
8
9
10
11
12
13
14
15
16
17
18
19
20
21
22
23
version: "3"

networks:
gitea:
external: false

services:
server:
image: gitea/gitea:1.18.1
container_name: gitea
environment:
- USER_UID=1000
- USER_GID=1000
restart: always
networks:
- gitea
volumes:
- ./gitea:/data
- /etc/timezone:/etc/timezone:ro
- /etc/localtime:/etc/localtime:ro
ports:
- "3000:3000"
- "222:22"

不过在部署的过程中, 发现群晖无论是按照何种方式2部署, 均卡在初始化数据库的过程, 这个问题困扰了一天, 查阅多个文献使用了多种方式都不能解决问题, 遂采取曲线救国的方式, 因为我只是自己使用, 使用SQLite3就足矣支撑.

群晖没有/etc/timezone文件, 因此最终的docker-compose.yml如下

1
2
3
4
5
6
7
8
9
10
11
12
13
14
15
16
17
18
19
20
21
22
23
24
version: "3"

networks:
gitea:
name: gitea
external: false

services:
server:
image: gitea/gitea:1.18
container_name: gitea
environment:
- USER_UID=100001
- USER_GID=100001
restart: always
networks:
- gitea
volumes:
- ./data:/data
- /etc/localtime:/etc/localtime:ro
ports:
- "3333:3000"
- "2222:22"

Drone部署

Gitea | Drone

Server部署

  1. 创建Gitea系统级OAuth2应用

    创建OAuth2应用

    按照官方手册要求, 必须满足以下规范: schema://drone.your-company.com/login

  2. 记录返回的客户端ID客户端密钥, 并注意不要泄露

    记录客户端ID及密钥信息
  3. 🆙补充内容: 避免无法拉取私有库, 创建Gitea用户的Access Token

    创建Access Token
  4. 创建用于共享的密钥

    1
    openssl rand -hex 16

  5. 使用以下字段编写docker-compose.yml

    详细字段说明: Reference | Drone

    • DRONE_GITEA_CLIENT_ID

      [必选]Gitea的客户端ID

    • DRONE_GITEA_CLIENT_SECRET

      [必选]Gitea的客户端密钥

    • DRONE_GITEA_SERVER

      [必选]Gitea的完整URL地址, 例如https://gitea.company.com, 必须指定schema(http/https)

    • DRONE_GIT_ALWAYS_AUTH

      [可选]布尔值, 用于控制Drone拉取公开仓库时是否执行认证操作

    • DRONE_RPC_SECRET

      [必选]Drone的RPC认证密钥, 由上一步生成, 用于加密runner通讯. Runner和Drone服务必须使用相同的RPC密钥

    • DRONE_SERVER_HOST

      [必选]Drone的主机名或IP地址, 如果使用IP则必须添加端口号, 例如drone.company.com.

    • DRONE_SERVER_PROTO

      [必选]Drone的schema, http/https, 当配置SSL或ACME后, 默认为https

    参考官方给出的docker run命令

    1
    2
    3
    4
    5
    6
    7
    8
    9
    10
    11
    12
    13
    14
    docker run \
    --volume=/var/lib/drone:/data \
    --env=DRONE_GITEA_SERVER=https://try.gitea.io \
    --env=DRONE_GITEA_CLIENT_ID=05136e57d80189bef462 \
    --env=DRONE_GITEA_CLIENT_SECRET=7c229228a77d2cbddaa61ddc78d45e \
    --env=DRONE_RPC_SECRET=super-duper-secret \
    --env=DRONE_SERVER_HOST=drone.company.com \
    --env=DRONE_SERVER_PROTO=https \
    --publish=80:80 \
    --publish=443:443 \
    --restart=always \
    --detach=true \
    --name=drone \
    drone/drone:2

    🆙补充内容: 根据注册说明3文档, 建议添加以下环境变量

    1
    DRONE_USER_FILTER=octocat,spaceghost

    🆙补充内容: 根据管理说明4文档以及引用5文档, 建议启动时创建管理员账号

    1
    DRONE_USER_CREATE=username:octocat,machine:false,admin:true,token:55f24eb3d61ef6ac5e83d550178638dc

    最终docker-compose.yml如下

    1
    2
    3
    4
    5
    6
    7
    8
    9
    10
    11
    12
    13
    14
    15
    16
    17
    18
    19
    20
    21
    22
    23
    24
    25
    26
    27
    28
    29
    30
    31
    32
    33
    version: "3"

    networks:
    drone:
    name: drone
    external: false

    services:
    server:
    image: drone/drone:2
    container_name: drone
    environment:
    - DRONE_GITEA_CLIENT_ID=客户端ID
    - DRONE_GITEA_CLIENT_SECRET=客户端密钥
    - DRONE_GITEA_SERVER=https://gitea.company.com
    - DRONE_RPC_SECRET=RPC密钥
    - DRONE_SERVER_HOST=drone.company.com
    - DRONE_SERVER_PROTO=https
    - DRONE_GIT_ALWAYS_AUTH=true
    - DRONE_GIT_USERNAME=x-oauth-token
    - DRONE_GIT_PASSWORD=Gitea的Access Token
    - DRONE_USER_FILTER=tom,jerry
    - DRONE_USER_CREATE=username:tom,machine:false,admin:true,token:tom的密码
    restart: always
    networks:
    - drone
    volumes:
    - ./data:/data
    - /etc/localtime:/etc/localtime:ro
    ports:
    - "80:80"
    - "443:443"

  6. 登录页面, 可以看到个人应用

    Drone页面
  7. 点击应用并激活即可使用

    激活应用

Runner部署

使用以下字段编写docker-compose.yml

详细字段说明: Reference | Drone

Install On Linux | Drone

  • DRONE_RPC_HOST

    [必选]Drone服务地址, 可附加端口号

  • DRONE_RPC_PROTO

    [必选]Drone服务的schema: http/https

  • DRONE_RPC_SECRET

    [必选]RPC通讯密码, 与服务端必须一致

1
2
3
4
5
6
7
8
9
10
11
12
13
14
15
16
17
18
19
20
21
22
23
24
25
26
27
28
29
30
31
32
33
34
35
36
37
38
39
40
41
42
43
44
45
46
47
48
49
50
51
52
version: "3"

networks:
drone:
name: drone
external: false

services:
server:
image: drone/drone:2
container_name: drone
environment:
- DRONE_GITEA_CLIENT_ID=客户端ID
- DRONE_GITEA_CLIENT_SECRET=客户端密钥
- DRONE_GITEA_SERVER=https://gitea.company.com
- DRONE_RPC_SECRET=RPC密钥
- DRONE_SERVER_HOST=drone.company.com
- DRONE_SERVER_PROTO=https
- DRONE_GIT_ALWAYS_AUTH=true
- DRONE_GIT_USERNAME=x-oauth-token
- DRONE_GIT_PASSWORD=Gitea的Access Token
- DRONE_USER_FILTER=tom,jerry
- DRONE_USER_CREATE=username:tom,machine:false,admin:true,token:tom的密码
restart: always
networks:
- drone
volumes:
- ./data:/data
- /etc/localtime:/etc/localtime:ro
ports:
- "80:80"
- "443:443"

# 以上是原Drone服务
runner:
image: drone/drone-runner-docker:1
container_name: drone_runner
environment:
- DRONE_RPC_PROTO=https
- DRONE_RPC_SECRET=RPC密钥
- DRONE_RPC_HOST=drone.company.com
- DRONE_RUNNER_NAME=drone_runner
- DRONE_RUNNER_CAPACITY=2
restart: always
networks:
- drone
volumes:
- /var/run/docker.sock:/var/run/docker.sock
ports:
- "3000:3000"
depends_on:
- server

检查部署是否成功

1
docker logs drone_runner
部署成功

CI实现

测试过程

GiteaDrone结合使用, 以实现CI功能

参考Docker Pipelines | Drone

在已激活的项目中创建测试.drone.yml, 测试内容如下

1
2
3
4
5
6
7
8
9
10
kind: pipeline
type: docker
name: default

steps:
- name: greeting
image: alpine
commands:
- echo hello
- echo world

登录Drone页面发现并没有自动触发, 手工尝试触发一下

手动触发部署

查看Gitea中的Webhook配置, 操作如图

Webhook设置

点击推送的记录情况, 可以看到报错

Webhook报错
1
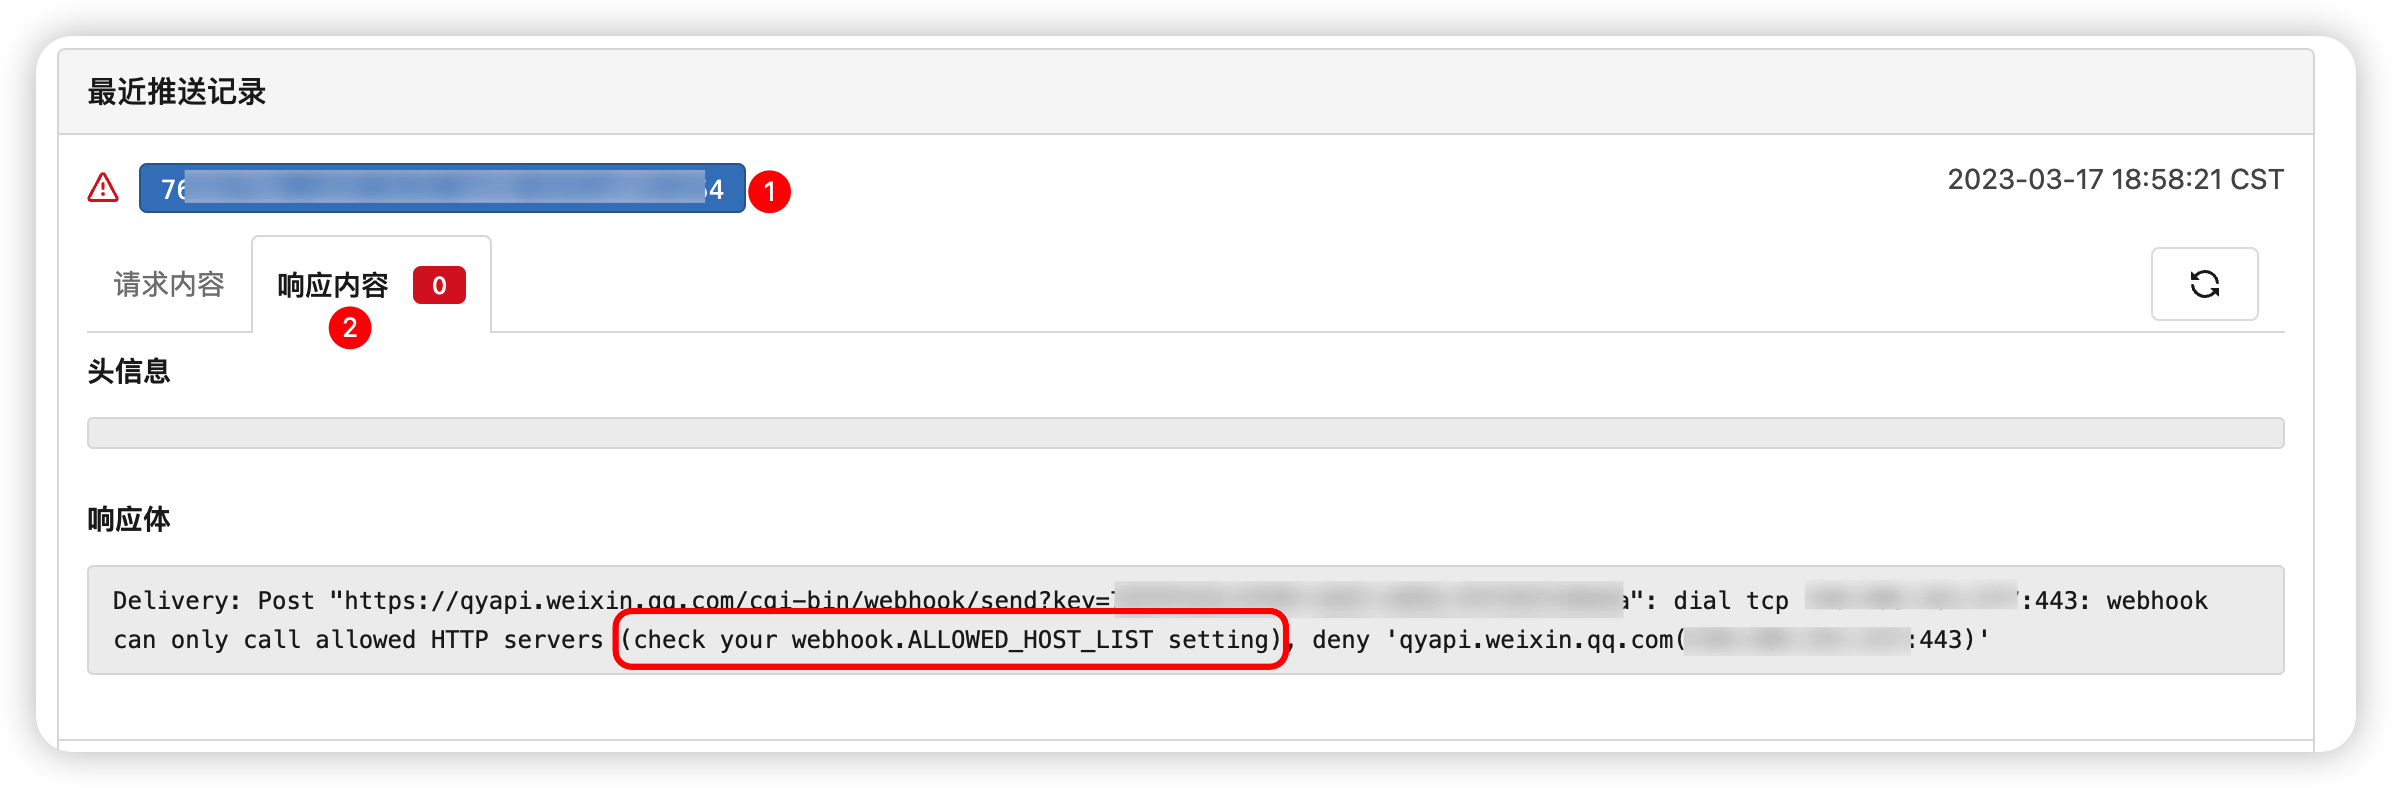
Delivery: Post "https://drone.company.com/hook?secret=**************": dial tcp 127.0.0.1:3000: webhook can only call allowed HTTP servers (check your webhook.ALLOWED_HOST_LIST setting), deny 'drone.company.com(127.0.0.1:3000)'

参见Webhook相关说明6, 需要添加以下内容到Gitea的配置文件data/gitea/conf/app.ini

1
2
[webhook]
ALLOWED_HOST_LIST=loopback,private,*.company.com

👍测可以触发Drone, 但是在Gitea仍有报错🙅

1
Delivery: Post "https://drone.company.com/hook?secret=********": context deadline exceeded (Client.Timeout exceeded while awaiting headers)

参考上面链接7, 修改配置, 增加超时时间

1
2
3
[webhook]
ALLOWED_HOST_LIST=loopback,private,*.company.com
DELIVER_TIMEOUT=20

👍实测通过, 问题全部解决

可以推送Webhook

实际案例

部署Hexo静态文件

使用Hexo构建文档并通过rsync推送到远端

Temporary Volumes | Drone

Per Repository | Drone

前置条件

💁配置Drone项目的Secrets, 如下:

  • DEPLOY_HOST: 部署主机
  • DEPLOY_PASS: 部署密码
  • DEPLOY_PATH: 部署路径
  • DEPLOY_PORT: 部署端口
  • DEPLOY_USER: 部署用户
Secrets配置

模板

默认情况项目中命名为.drone.yml

1
2
3
4
5
6
7
8
9
10
11
12
13
14
15
16
17
18
19
20
21
22
23
24
25
26
27
28
29
30
31
32
33
34
35
36
37
38
39
40
41
---
# Refer: https://docs.drone.io/pipeline/docker/examples/services/docker/
# Refer: https://docs.drone.io/pipeline/environment/reference/
# Refer: https://docs.drone.io/pipeline/environment/substitution/
# Refer: https://docs.drone.io/pipeline/environment/syntax/
# Refer: https://www.ruanyifeng.com/blog/2020/08/rsync.html

# Desc: Deploy Hexo static file to remote host

kind: pipeline
type: docker
name: hexo

steps:
- name: deploy
image: node:alpine
environment:
DEPLOY_PASS:
from_secret: DEPLOY_PASS
DEPLOY_PORT:
from_secret: DEPLOY_PORT
DEPLOY_USER:
from_secret: DEPLOY_USER
DEPLOY_HOST:
from_secret: DEPLOY_HOST
DEPLOY_PATH:
from_secret: DEPLOY_PATH
commands:
- sed -i 's/dl-cdn.alpinelinux.org/mirrors.ustc.edu.cn/g' /etc/apk/repositories
- apk add sshpass openssh-client git rsync
- node -v
- npm --registry https://npmreg.proxy.ustclug.org/ install -g hexo-cli
- npm --registry https://npmreg.proxy.ustclug.org/ install --force
- hexo clean
- hexo generate
- |
sshpass -p $DEPLOY_PASS \
rsync -av --delete \
-e "ssh -p $DEPLOY_PORT \
-o StrictHostKeyChecking=no" \
public/* $DEPLOY_USER@$DEPLOY_HOST:$DEPLOY_PATH/

部署Docker镜像

单架构类型

Drone项目设置为信任

默认情况项目中命名为.drone.yml

1
2
3
4
5
6
7
8
9
10
11
12
13
14
15
16
17
18
19
20
21
22
23
24
25
26
27
28
29
30
31
32
33
34
35
36
37
38
39
40
41
42
43
44
45
46
47
48
49
---
# Refer: https://docs.drone.io/pipeline/docker/examples/services/docker/
# Refer: https://docs.drone.io/pipeline/environment/reference/
# Refer: https://docs.drone.io/pipeline/environment/substitution/
# Refer: https://docs.drone.io/pipeline/environment/syntax/

# Requirement: Target repository in Drone **MUST** enable the `Trusted` setting.
# Desc: Deploy Docker to specify registry, such as index.docker.io

kind: pipeline
name: docker-deploy

steps:

- name: push_image
image: docker:dind
volumes:
- name: dockersock
path: /var/run/docker.sock
environment:
CI_BUILD_ARGS:
from_secret: CI_BUILD_ARGS
CI_REGISTRY_USER:
from_secret: CI_REGISTRY_USER
CI_REGISTRY_PASSWORD:
from_secret: CI_REGISTRY_PASSWORD
CI_REGISTRY:
from_secret: CI_REGISTRY
CI_REGISTRY_IMAGE:
from_secret: CI_REGISTRY_IMAGE
commands:
- docker info
- docker $CI_BUILD_ARGS login -u $CI_REGISTRY_USER -p $CI_REGISTRY_PASSWORD $CI_REGISTRY
- |
if [[ "$DRONE_COMMIT_BRANCH" == "$DRONE_REPO_BRANCH" ]]; then
export TAG=""
echo "Running on default branch '$DRONE_REPO_BRANCH': tag = 'latest'"
else
export TAG=":${DRONE_TAG##v}"
echo "Running on branch '$DRONE_COMMIT_BRANCH': tag = $TAG"
fi
- docker $CI_BUILD_ARGS build --pull -t "$CI_REGISTRY_IMAGE""$TAG" .
- docker $CI_BUILD_ARGS push "$CI_REGISTRY_IMAGE""$TAG"

volumes:
- name: dockersock
host:
path: /var/run/docker.sock

如提示: linter: untrusted repositories cannot mount host volumes, 见错误解决或参见下方通过service方式解决

无法设置信任情况

默认情况项目中命名为.drone.yml

1
2
3
4
5
6
7
8
9
10
11
12
13
14
15
16
17
18
19
20
21
22
23
24
25
26
27
28
29
30
31
32
33
34
35
36
37
38
39
40
41
42
43
44
45
46
47
48
49
50
51
52
53
54
55
56
---
# Refer: https://docs.drone.io/pipeline/docker/examples/services/docker/
# Refer: https://docs.drone.io/pipeline/environment/reference/
# Refer: https://docs.drone.io/pipeline/environment/substitution/
# Refer: https://docs.drone.io/pipeline/environment/syntax/
# Refer: https://docs.drone.io/pipeline/docker/examples/services/docker_dind/

# Desc: Deploy Docker to specify registry, such as index.docker.io

kind: pipeline
name: docker-deploy

steps:
- name: push_image
image: docker:dind
volumes:
- name: dockersock
path: /var/run
environment:
CI_BUILD_ARGS:
from_secret: CI_BUILD_ARGS
CI_REGISTRY_USER:
from_secret: CI_REGISTRY_USER
CI_REGISTRY_PASSWORD:
from_secret: CI_REGISTRY_PASSWORD
CI_REGISTRY:
from_secret: CI_REGISTRY
CI_REGISTRY_IMAGE:
from_secret: CI_REGISTRY_IMAGE
commands:
- sleep 10 # give docker enough time to start
- docker info
- docker $CI_BUILD_ARGS login -u $CI_REGISTRY_USER -p $CI_REGISTRY_PASSWORD $CI_REGISTRY
- |
if [[ "$DRONE_COMMIT_BRANCH" == "$DRONE_REPO_BRANCH" ]]; then
export TAG=""
echo "Running on default branch '$DRONE_REPO_BRANCH': tag = 'latest'"
else
export TAG=":${DRONE_TAG##v}"
echo "Running on branch '$DRONE_COMMIT_BRANCH': tag = $TAG"
fi
- docker $CI_BUILD_ARGS build --pull -t "$CI_REGISTRY_IMAGE""$TAG" .
- docker $CI_BUILD_ARGS push "$CI_REGISTRY_IMAGE""$TAG"

services:
- name: docker
image: docker:dind
privileged: true
volumes:
- name: dockersock
path: /var/run

volumes:
- name: dockersock
temp: {}

多架构部署(测试暂未通过)

非插件

Docker (dind) | Drone

默认情况项目中命名为.drone.yml

1
2
3
4
5
6
7
8
9
10
11
12
13
14
15
16
17
18
19
20
21
22
23
24
25
26
27
28
29
30
31
32
33
34
35
36
37
38
39
40
41
42
43
44
45
46
47
48
49
50
51
52
53
54
55
56
57
58
59
60
61
62
---
# Refer: https://docs.drone.io/pipeline/docker/examples/services/docker/
# Refer: https://docs.drone.io/pipeline/environment/reference/
# Refer: https://docs.drone.io/pipeline/environment/substitution/
# Refer: https://docs.drone.io/pipeline/environment/syntax/
# Refer: https://docs.drone.io/pipeline/docker/examples/services/docker_dind/

# Desc: Deploy multi architecture Docker image to specify registry, such as index.docker.io

kind: pipeline
name: docker-deploy

environment:
REGISTRY: https://index.docker.io/v1/
REGISTRY_USERNAME: chowrex
ARCH: linux/arm,linux/arm64,linux/amd64
IAMGE_NAME: chowrex/hexo-blog

steps:
- name: push_image
image: docker:dind
volumes:
- name: dockersock
path: /var/run
environment:
REGISTRY_PASS:
from_secret: REGISTRY_PASS
commands:
- sleep 30 # give docker enough time to start
- docker login -u $REGISTRY_USERNAME -p $REGISTRY_PASS $REGISTRY
- |
if [[ "$DRONE_COMMIT_BRANCH" == "$DRONE_REPO_BRANCH" ]]; then
export TAG=""
echo "Running on default branch '$DRONE_REPO_BRANCH': tag = 'latest'"
else
export TAG=":${DRONE_TAG##v}"
echo "Running on branch '$DRONE_COMMIT_BRANCH': tag = $TAG"
fi
- |
cat << EOF > buildkit-config.toml
[registry."${REGISTRY}"]
http = true
insecure = true
EOF
# If you are using `http` or `insecure` registry, uncomment below 2 lines
# - docker buildx create --use --buildkitd-flags '--allow-insecure-entitlement security.insecure' --config buildkit-config.toml
# - docker buildx build --platform $ARCH -t "$CI_REGISTRY_IMAGE""$TAG" --push --allow security.insecure .
- docker buildx create --use
- docker buildx build --platform $ARCH -t "$IAMGE_NAME""$TAG" --push .

services:
- name: docker
image: docker:dind
privileged: true
volumes:
- name: dockersock
path: /var/run

volumes:
- name: dockersock
temp: {}

使用插件

drone-docker-buildx | Drone CI Plugins

More beginner friendly doc · Issue #62 · thegeeklab/drone-docker-buildx

其中, 引用原Poster提到的最后一段结论

It might be worth mentioning that both privileged and experimental are currently needed in order to enable cross-build of different platform images. But you are right.

因此前提条件必须启用: privilegedexperimental

1
2
3
4
5
6
7
8
9
10
11
12
13
14
15
16
17
18
19
20
21
22
23
24
25
26
27
28
---
# Refer: https://docs.drone.io/pipeline/docker/examples/services/docker/
# Refer: https://docs.drone.io/pipeline/environment/reference/
# Refer: https://docs.drone.io/pipeline/environment/substitution/
# Refer: https://docs.drone.io/pipeline/environment/syntax/
# Refer: https://docs.drone.io/pipeline/docker/examples/services/docker_dind/

# Desc: Deploy multi architecture Docker image to specify registry, such as index.docker.io
# Fully support by: https://drone-plugin-index.geekdocs.de/plugins/drone-docker-buildx

kind: pipeline
name: docker-multi-arch

steps:
- name: docker
image: thegeeklab/drone-docker-buildx
privileged: true # This **MUST** be true
settings:
# According to issue below, this `experimental` **MUST** be true
# https://github.com/thegeeklab/drone-docker-buildx/issues/62
experimental: true
username: YOUR/NAME/HERE
password:
from_secret: GET_PASS_FROM_SECRET
repo: YOUR/REPO/NAME
auto_tag: true
platforms: linux/arm,linux/arm64,linux/amd64 # Build arm/arm64 and amd64

⚠️以上内容在群晖测试未通过⚠️

⚠️以上内容在群晖测试未通过⚠️

⚠️以上内容在群晖测试未通过⚠️

1
.buildkit_qemu_emulator: /bin/sh: Invalid ELF image for this architecture

以上是错误信息, 待后续完善

部署Sphinx Docs

默认情况项目中命名为.drone.yml

1
2
3
4
5
6
7
8
9
10
11
12
13
14
15
16
17
18
19
20
21
22
23
24
25
26
27
28
29
30
31
32
33
34
35
36
37
38
39
40
41
42
43
---
# Refer: https://docs.drone.io/pipeline/docker/examples/services/docker/
# Refer: https://docs.drone.io/pipeline/environment/reference/
# Refer: https://docs.drone.io/pipeline/environment/substitution/
# Refer: https://docs.drone.io/pipeline/environment/syntax/

# Desc: Deploy Sphinx Docs static files.

kind: pipeline
name: sphinx

steps:

- name: deploy
image: sphinxdoc/sphinx
environment:
DEPLOY_PASS:
from_secret: DEPLOY_PASS
DEPLOY_PORT:
from_secret: DEPLOY_PORT
DEPLOY_USER:
from_secret: DEPLOY_USER
DEPLOY_HOST:
from_secret: DEPLOY_HOST
SRC_PATH: /path/to/docs
DEPLOY_PATH: /path/to/your/remote
commands:
- python -V # Print out python version for debugging
- sed -i 's/deb.debian.org/mirrors.ustc.edu.cn/g' /etc/apt/sources.list # Using USTC mirror.
- apt update. # Make cache
- apt install -y gcc python3-dev sshpass openssh-client rsync # Install dependences
- pip install -i https://pypi.tuna.tsinghua.edu.cn/simple -U pip # Update pip.
- pip config set global.index-url https://pypi.tuna.tsinghua.edu.cn/simple # Using Tsinghua mirror.

- pip install -r requirements.txt
- sphinx-build $SRC_PATH public
- |
sshpass -p $DEPLOY_PASS \
rsync -av --delete \
-e "ssh -p $DEPLOY_PORT \
-o StrictHostKeyChecking=no" \
public/* $DEPLOY_USER@$DEPLOY_HOST:$DEPLOY_PATH/

补充内容

Gitea

增加使用LDAP认证

项目管理秘术之LDAP+Gitea统一认证Git服务器账户管理_XellossRyan的博客-CSDN博客_gitea 认证源

Authentication - Docs

参考了上面两个文档, 实际如果添加Gitea对LDAP认证的配置信息说明如下

  • 认证名称

    说明: 显示的LDAP认证名称, 随意填写即可

  • 安全协议

    • Unencrypted: 不使用加密LDAP, 默认端口389
    • LDAPS: 使用SSL加密的LDAP, 默认端口636
    • StartTLS: 使用StartTLS加密的LDAP, 默认端口389

    关于LDAPSLDAP StartTLS区别, 参见:

    LDAP over TLS (STARTTLS) and LDAP over SSL (LDAPS) - Product Knowledge Base - Product Knowledge Base

    ldaps 与 ldap over TLS 的区别_猪猪侠|ZZXia的博客-CSDN博客_ldaps

    TL;DR: 如果需要加密, 建议使用LDAP StartTLS, 并指明端口389, 协议StartTLS

  • 主机

    说明: LDAP服务的地址

  • 端口

    说明: 如上面指出的, 默认LDAPS636, 其他为389

  • 绑定 DN

    说明: 用于LDAP认证提取信息的用户, 可以使用只读用户

  • 绑定密码

    说明: 用于LDAP认证提取信息的用户密码, 建议使用只读用户

  • 用户搜索基准

    说明: 用于搜索用户的BASE DN, 一般为ou=users,dc=yourcompany,dc=com

  • 用户过滤规则

    说明: 详见上方官方链接原文

    • User Filter (required)
      • An LDAP filter declaring how to find the user record that is attempting to authenticate. The %s matching parameter will be substituted with login name given on sign-in form.
      • Example: (&(objectClass=posixAccount)(uid=%s))
      • Example for Microsoft Active Directory (AD): (&(objectCategory=Person)(memberOf=CN=user-group,OU=example,DC=example,DC=org)(sAMAccountName=%s)(!(UserAccountControl:1.2.840.113556.1.4.803:=2)))
      • To substitute more than once, %[1]s should be used instead, e.g. when matching supplied login name against multiple attributes such as user identifier, email or even phone number.
      • Example: (&(objectClass=Person)(|(uid=%[1]s)(mail=%[1]s)(mobile=%[1]s)))

    我实际使用的为: (&(memberof=cn=gitea-users,ou=groups,dc=yourcompany,dc=com)(uid=%s))

  • 管理员过滤规则

    说明: 参考用户过滤规则即可

  • 用户名属性

    说明: 用于登录的用户ID名称

  • 电子邮箱属性

    说明: 用于展示用户邮箱信息的字段

配置截图

从其他Git服务迁移项目

参考8, 需要先配置应用设置, 允许指定的URL进行迁移, 修改data/gitea/conf/app.ini, 增加如下内容

1
2
[migrations]
ALLOWED_DOMAINS=github.com,*.github.com,company.com,*.company.com

为Github添加拉取代理

gitea配置全局代理用于镜像github源 - 腾讯云开发者社区-腾讯云

Config Cheat Sheet - Docs

修改data/gitea/conf/app.ini, 增加如下内容

1
2
3
4
[proxy]
PROXY_ENABLED = true
PROXY_URL = socks://127.0.0.1:1080
PROXY_HOSTS = *.github.com

设置submodule拉取认证

如果在一个项目中, 通过submodule的方式引用了其他项目, 除非被引用项目具有公开访问权限, 否则一定提示无法拉取子模块的错误, 此时就需要通过OAuth的方式实现对私有/内部等项目的拉取.

Step1 检查目标项目是否支持部署令牌/部署密钥等方式

希望Gitea支持类似Gitlab访问令牌

Gitlab访问令牌

⛔但是由于定位不同, Gitea注重轻量化, 因此并没有访问令牌的设置

Gitea支持部署密钥

Step2 检查群组是否可以支持访问令牌

检查群组是否可以提供只读拉取群组仓库权限

Gitea群组不提供访问令牌

⛔群组只能创建基于OAuth2的应用用于认证服务, 并不能拿到仓库信息

Step3 检查用户是否支持访问令牌

通过用户的个人设置页面, 可以添加访问令牌

用户设置可以添加令牌

不过美中不足的是这个令牌具有完全访问账号的权限, 因此不能用项目属主创建令牌, 否则存在泄露风险!

Step4 创建单独部署账号

因为GiteaAccess Token具有账号的全部权限, 因此单独创建一个用于部署的账号是很有必要的, 我这里使用管理员账号创建了一个名为deploy的部署账号

关于受限账号, 见FAQ - Docs

部署账号

额外设置:

  • 最大仓库数设置为0
  • ☑️勾选受限
  • ⏹️取消勾选允许创建组织

Step5 为部署账号添加仓库只读权限

在项目中依次点击: 设置协作者搜索用户输入用户名点击相应用户增加协作者修改权限

添加协作者
控制协作者权限

以下是动图版

动图添加协作者

依次为所有需要只读权限的项目添加协作者, 如果某个组织内的仓库需要只读, 类似同理

Step6 检查部署账号并创建访问令牌

使用部署账号登录, 可以看到所有赋予权限的仓库

部署账号仓库

按照下图创建访问令牌

创建用户访问令牌

记录返回的Token字符串

Step7 测试访问令牌

一些针对于OAuth2简单的介绍

一文看懂OAuth2.0认证 - 知乎

OAuth2

进入一个已经授权的项目, 按照下图复制克隆地址, 必须是HTTPS地址

复制克隆地址
怎么用?

Gitlab针对于基于HTTPS情况使用Git+Access Token的相关说明

OAuth 2.0 identity provider API | GitLab

StackOverflow也有相关说明

git - Using GitLab token to clone without authentication - Stack Overflow

地址语法必须满足

1
git clone https://oauth2:ACCESS_TOKEN@YOUR.COMPANY.COM/USER_OR_GROUP/REPO_NAME.git
为什么这么用?

查阅了不少文档, 但是并没有发现能解释为什么这么用的说明, 最后在Git的官网找到的相关说明

  • Git支持的URL 类型: Git - git-clone Documentation

    The following syntaxes may be used with them:

    • ssh://[user@]host.xz[:port]/path/to/repo.git/
    • git://host.xz[:port]/path/to/repo.git/
    • http[s]://host.xz[:port]/path/to/repo.git/
    • ftp[s]://host.xz[:port]/path/to/repo.git/
  • Git的凭证存储: Git - Credential Storage

    Here’s the same example from above, but skipping git-credential and going straight for git-credential-store:

    1
    2
    3
    4
    5
    6
    7
    8
    9
    10
    11
    $ git credential-store --file ~/git.store store (1)
    protocol=https
    host=mygithost
    username=bob
    password=s3cre7
    $ git credential-store --file ~/git.store get (2)
    protocol=https
    host=mygithost

    username=bob (3)
    password=s3cre7
    1. Here we tell git-credential-store to save some credentials: the username “bob” and the password “s3cre7” are to be used when https://mygithost is accessed.
    2. Now we’ll retrieve those credentials. We provide the parts of the connection we already know (https://mygithost), and an empty line.
    3. git-credential-store replies with the username and password we stored above.

    Here’s what the ~/git.store file looks like:

    1
    https://bob:s3cre7@mygithost

    It’s just a series of lines, each of which contains a credential-decorated URL. The osxkeychain and wincred helpers use the native format of their backing stores, while cache uses its own in-memory format (which no other process can read).

实际测试
可以通过AccessToken拉取仓库

Step8 变更子模块URL地址

变更子模块地址

如上图展示, 变更子模块的URL地址, 命令如下

1
2
3
4
# 显示当前的所有子模块
git submodule
# 变更子模块的路径地址
git submodule set-url PATH/TO/SUBMODULE {http(s)|git|ssh}://oauth2:ACCESS_TOKEN@YOUR.COMPANY.COM/USER_OR_GROUP/REPO_NAME.git

填坑

Gitea

曲线救国解决部署问题

因为群晖迟迟无法通过数据库初始化的过程, 因此使用了另外一个也是同样基于X86_64的虚拟机上部署完, 然后导出持久化文件到群晖相关目录搞定的, 因为我的Mac是m1芯片的, 架构不同, 所以需要其他虚拟机搞定.

这个方法也提供了一个额外的思路, 比如其他系统不好部署或者初始化太慢, 可以使用其他高配资源创建完, 复制持久化文件到目标资源启动容器的方式加快部署进程

解决报错: Permission denied (publickey)

提示权限不足

Step1 检查SSH key

  1. 重新提取SSH公钥

    1
    cat $HOME/.ssh/id_rsa.pub

    提取SSH公钥
  2. 创建并粘贴到Gitea的个人SSH密钥

    添加SSH密钥
  3. 点击创建后的验证按钮, 验证Key有效性

    创建后点击验证
  4. 使用自动生成的语句验证SSH签名

    验证SSH签名

    1
    2
    3
    4
    5
    6
    7
    8
    9
    10
    11
    # 也可以使用下方语句验证

    TOKEN=******************
    PRIVATE_KEY=$HOME/.ssh/id_rsa

    # For MAC only
    echo -n $TOKEN | ssh-keygen -Y sign -n gitea -f $PRIVATE_KEY | pbcopy

    # For Windows only
    echo -n $TOKEN | ssh-keygen -Y sign -n gitea -f $PRIVATE_KEY | clip

    上面的命令会将返回值自动拷贝到剪贴板

  5. 检查验证结果

    密钥已验证

问题不在这里🙅

Step2 检查SSH客户端

Gitee ssh 公钥配置好后,仍然 permission denied 的排查过程及解决方法_寒泉Hq的博客-CSDN博客

通过ssh -Tvvv git@gitea.company.com命令排查是否是由于SSH客户端问题

1
2
3
4
5
6
7
8
9
10
11
12
13
14
15
16
17
18
19
20
21
22
23
24
25
26
27
28
29
30
31
32
33
34
35
36
37
38
39
40
41
42
43
44
45
46
47
48
49
50
51
52
53
54
55
56
57
58
59
60
61
62
63
64
65
66
67
68
69
70
71
72
73
74
75
76
77
78
79
80
81
82
83
84
85
86
87
88
89
90
91
92
93
94
95
96
97
98
99
100
101
102
103
104
105
106
107
108
109
110
111
112
113
114
115
116
117
118
119
120
121
122
123
124
125
126
127
128
129
130
131
132
133
134
135
136
137
OpenSSH_9.1p1, OpenSSL 1.1.1s  1 Nov 2022
debug1: Reading configuration data /Users/user/.ssh/config
debug1: /Users/user/.ssh/config line 298: Applying options for *
debug1: Reading configuration data /opt/homebrew/etc/ssh/ssh_config
debug2: resolving "gitea.company.com" port 2222
debug3: resolve_host: lookup gitea.company.com:2222
debug3: ssh_connect_direct: entering
debug1: Connecting to gitea.company.com [*********] port 2222.
debug3: set_sock_tos: set socket 5 IP_TOS 0x48
debug1: Connection established.
debug1: identity file /Users/user/.ssh/id_rsa type 0
debug1: identity file /Users/user/.ssh/id_rsa-cert type -1
debug1: identity file /Users/user/.ssh/id_ecdsa type -1
debug1: identity file /Users/user/.ssh/id_ecdsa-cert type -1
debug1: identity file /Users/user/.ssh/id_ecdsa_sk type -1
debug1: identity file /Users/user/.ssh/id_ecdsa_sk-cert type -1
debug1: identity file /Users/user/.ssh/id_ed25519 type -1
debug1: identity file /Users/user/.ssh/id_ed25519-cert type -1
debug1: identity file /Users/user/.ssh/id_ed25519_sk type -1
debug1: identity file /Users/user/.ssh/id_ed25519_sk-cert type -1
debug1: identity file /Users/user/.ssh/id_xmss type -1
debug1: identity file /Users/user/.ssh/id_xmss-cert type -1
debug1: identity file /Users/user/.ssh/id_dsa type -1
debug1: identity file /Users/user/.ssh/id_dsa-cert type -1
debug1: Local version string SSH-2.0-OpenSSH_9.1
debug1: Remote protocol version 2.0, remote software version OpenSSH_9.0
debug1: compat_banner: match: OpenSSH_9.0 pat OpenSSH* compat 0x04000000
debug2: fd 5 setting O_NONBLOCK
debug1: Authenticating to gitea.company.com:2222 as 'git'
debug3: put_host_port: [gitea.company.com]:2222
debug1: load_hostkeys: fopen /opt/homebrew/etc/ssh/ssh_known_hosts: No such file or directory
debug1: load_hostkeys: fopen /opt/homebrew/etc/ssh/ssh_known_hosts2: No such file or directory
debug3: order_hostkeyalgs: no algorithms matched; accept original
debug3: send packet: type 20
debug1: SSH2_MSG_KEXINIT sent
debug3: receive packet: type 20
debug1: SSH2_MSG_KEXINIT received
debug2: local client KEXINIT proposal
debug2: KEX algorithms: sntrup761x25519-sha512@openssh.com,curve25519-sha256,curve25519-sha256@libssh.org,ecdh-sha2-nistp256,ecdh-sha2-nistp384,ecdh-sha2-nistp521,diffie-hellman-group-exchange-sha256,diffie-hellman-group16-sha512,diffie-hellman-group18-sha512,diffie-hellman-group14-sha256,ext-info-c
debug2: host key algorithms: ssh-ed25519-cert-v01@openssh.com,ecdsa-sha2-nistp256-cert-v01@openssh.com,ecdsa-sha2-nistp384-cert-v01@openssh.com,ecdsa-sha2-nistp521-cert-v01@openssh.com,sk-ssh-ed25519-cert-v01@openssh.com,sk-ecdsa-sha2-nistp256-cert-v01@openssh.com,rsa-sha2-512-cert-v01@openssh.com,rsa-sha2-256-cert-v01@openssh.com,ssh-ed25519,ecdsa-sha2-nistp256,ecdsa-sha2-nistp384,ecdsa-sha2-nistp521,sk-ssh-ed25519@openssh.com,sk-ecdsa-sha2-nistp256@openssh.com,rsa-sha2-512,rsa-sha2-256,ssh-rsa
debug2: ciphers ctos: chacha20-poly1305@openssh.com,aes128-ctr,aes192-ctr,aes256-ctr,aes128-gcm@openssh.com,aes256-gcm@openssh.com
debug2: ciphers stoc: chacha20-poly1305@openssh.com,aes128-ctr,aes192-ctr,aes256-ctr,aes128-gcm@openssh.com,aes256-gcm@openssh.com
debug2: MACs ctos: umac-64-etm@openssh.com,umac-128-etm@openssh.com,hmac-sha2-256-etm@openssh.com,hmac-sha2-512-etm@openssh.com,hmac-sha1-etm@openssh.com,umac-64@openssh.com,umac-128@openssh.com,hmac-sha2-256,hmac-sha2-512,hmac-sha1
debug2: MACs stoc: umac-64-etm@openssh.com,umac-128-etm@openssh.com,hmac-sha2-256-etm@openssh.com,hmac-sha2-512-etm@openssh.com,hmac-sha1-etm@openssh.com,umac-64@openssh.com,umac-128@openssh.com,hmac-sha2-256,hmac-sha2-512,hmac-sha1
debug2: compression ctos: none,zlib@openssh.com,zlib
debug2: compression stoc: none,zlib@openssh.com,zlib
debug2: languages ctos:
debug2: languages stoc:
debug2: first_kex_follows 0
debug2: reserved 0
debug2: peer server KEXINIT proposal
debug2: KEX algorithms: sntrup761x25519-sha512@openssh.com,curve25519-sha256,curve25519-sha256@libssh.org,ecdh-sha2-nistp256,ecdh-sha2-nistp384,ecdh-sha2-nistp521,diffie-hellman-group-exchange-sha256,diffie-hellman-group16-sha512,diffie-hellman-group18-sha512,diffie-hellman-group14-sha256
debug2: host key algorithms: ssh-ed25519,rsa-sha2-512,rsa-sha2-256,ecdsa-sha2-nistp256
debug2: ciphers ctos: chacha20-poly1305@openssh.com,aes128-ctr,aes192-ctr,aes256-ctr,aes128-gcm@openssh.com,aes256-gcm@openssh.com
debug2: ciphers stoc: chacha20-poly1305@openssh.com,aes128-ctr,aes192-ctr,aes256-ctr,aes128-gcm@openssh.com,aes256-gcm@openssh.com
debug2: MACs ctos: umac-64-etm@openssh.com,umac-128-etm@openssh.com,hmac-sha2-256-etm@openssh.com,hmac-sha2-512-etm@openssh.com,hmac-sha1-etm@openssh.com,umac-64@openssh.com,umac-128@openssh.com,hmac-sha2-256,hmac-sha2-512,hmac-sha1
debug2: MACs stoc: umac-64-etm@openssh.com,umac-128-etm@openssh.com,hmac-sha2-256-etm@openssh.com,hmac-sha2-512-etm@openssh.com,hmac-sha1-etm@openssh.com,umac-64@openssh.com,umac-128@openssh.com,hmac-sha2-256,hmac-sha2-512,hmac-sha1
debug2: compression ctos: none,zlib@openssh.com
debug2: compression stoc: none,zlib@openssh.com
debug2: languages ctos:
debug2: languages stoc:
debug2: first_kex_follows 0
debug2: reserved 0
debug1: kex: algorithm: sntrup761x25519-sha512@openssh.com
debug1: kex: host key algorithm: ssh-ed25519
debug1: kex: server->client cipher: chacha20-poly1305@openssh.com MAC: <implicit> compression: none
debug1: kex: client->server cipher: chacha20-poly1305@openssh.com MAC: <implicit> compression: none
debug3: send packet: type 30
debug1: expecting SSH2_MSG_KEX_ECDH_REPLY
debug3: receive packet: type 31
debug1: SSH2_MSG_KEX_ECDH_REPLY received
debug1: Server host key: ssh-ed25519 SHA256:NOOMJ2iFo4w+58+E/bq3OymZFfjSZhK6NbBIBVlAniU
debug3: put_host_port: [*********]:2222
debug3: put_host_port: [gitea.company.com]:2222
debug1: load_hostkeys: fopen /opt/homebrew/etc/ssh/ssh_known_hosts: No such file or directory
debug1: load_hostkeys: fopen /opt/homebrew/etc/ssh/ssh_known_hosts2: No such file or directory
debug1: checking without port identifier
debug1: load_hostkeys: fopen /opt/homebrew/etc/ssh/ssh_known_hosts: No such file or directory
debug1: load_hostkeys: fopen /opt/homebrew/etc/ssh/ssh_known_hosts2: No such file or directory
Warning: Permanently added '[gitea.company.com]:2222' (ED25519) to the list of known hosts.
debug3: send packet: type 21
debug2: ssh_set_newkeys: mode 1
debug1: rekey out after 134217728 blocks
debug1: SSH2_MSG_NEWKEYS sent
debug1: expecting SSH2_MSG_NEWKEYS
debug3: receive packet: type 21
debug1: SSH2_MSG_NEWKEYS received
debug2: ssh_set_newkeys: mode 0
debug1: rekey in after 134217728 blocks
debug3: ssh_get_authentication_socket_path: path '/Users/user/Library/Containers/org.hejki.osx.sshce.agent/Data/socket.ssh'
debug1: get_agent_identities: ssh_get_authentication_socket: No such file or directory
debug1: Will attempt key: /Users/user/.ssh/id_rsa RSA SHA256:sJHCf0oMZzQrzAMZqxSpUKsA6qevzZh5VqhRsHRIq84
debug1: Will attempt key: /Users/user/.ssh/id_ecdsa
debug1: Will attempt key: /Users/user/.ssh/id_ecdsa_sk
debug1: Will attempt key: /Users/user/.ssh/id_ed25519
debug1: Will attempt key: /Users/user/.ssh/id_ed25519_sk
debug1: Will attempt key: /Users/user/.ssh/id_xmss
debug1: Will attempt key: /Users/user/.ssh/id_dsa
debug2: pubkey_prepare: done
debug3: send packet: type 5
debug3: receive packet: type 7
debug1: SSH2_MSG_EXT_INFO received
debug1: kex_input_ext_info: server-sig-algs=<ssh-ed25519,sk-ssh-ed25519@openssh.com,ssh-rsa,rsa-sha2-256,rsa-sha2-512,ssh-dss,ecdsa-sha2-nistp256,ecdsa-sha2-nistp384,ecdsa-sha2-nistp521,sk-ecdsa-sha2-nistp256@openssh.com,webauthn-sk-ecdsa-sha2-nistp256@openssh.com>
debug1: kex_input_ext_info: publickey-hostbound@openssh.com=<0>
debug3: receive packet: type 6
debug2: service_accept: ssh-userauth
debug1: SSH2_MSG_SERVICE_ACCEPT received
debug3: send packet: type 50
debug3: receive packet: type 51
debug1: Authentications that can continue: publickey
debug3: start over, passed a different list publickey
debug3: preferred publickey,keyboard-interactive,password
debug3: authmethod_lookup publickey
debug3: remaining preferred: keyboard-interactive,password
debug3: authmethod_is_enabled publickey
debug1: Next authentication method: publickey
debug1: Offering public key: /Users/user/.ssh/id_rsa RSA SHA256:sJHCf0oMZzQrzAMZqxSpUKsA6qevzZh5VqhRsHRIq84
debug3: send packet: type 50
debug2: we sent a publickey packet, wait for reply
debug3: receive packet: type 51
debug1: Authentications that can continue: publickey
debug1: Trying private key: /Users/user/.ssh/id_ecdsa
debug3: no such identity: /Users/user/.ssh/id_ecdsa: No such file or directory
debug1: Trying private key: /Users/user/.ssh/id_ecdsa_sk
debug3: no such identity: /Users/user/.ssh/id_ecdsa_sk: No such file or directory
debug1: Trying private key: /Users/user/.ssh/id_ed25519
debug3: no such identity: /Users/user/.ssh/id_ed25519: No such file or directory
debug1: Trying private key: /Users/user/.ssh/id_ed25519_sk
debug3: no such identity: /Users/user/.ssh/id_ed25519_sk: No such file or directory
debug1: Trying private key: /Users/user/.ssh/id_xmss
debug3: no such identity: /Users/user/.ssh/id_xmss: No such file or directory
debug1: Trying private key: /Users/user/.ssh/id_dsa
debug3: no such identity: /Users/user/.ssh/id_dsa: No such file or directory
debug2: we did not send a packet, disable method
debug1: No more authentication methods to try.
git@gitea.company.com: Permission denied (publickey).

仔细核对了一下, 并未发现问题. 我又去查阅了官方文档9, 使用默认参数并不会影响到SSH情况, 尝试使用Telnet测试连通性

Telnet可通

可以连通并且可以识别到SSH协议, 问题不在这里🙅

Step3 检查SSH服务端

去Docker里使用docker logs -f gitea监控一下日志再次尝试克隆操作

权限错误

权限错误, 对于$HOME/.ssh目录, 权限必须是drwx------0700, 去宿主机检查一下

群晖会自动变更权限

群晖会自动覆写权限信息, 因此需要执行chmod 0700 .ssh

修正权限

再次尝试克隆, 一切正常啦🎉

正常使用

解决报错: 文件体积 (***MB)超过了最大允许体积 (4 MB)

🆙2023-02-10

Config Cheat Sheet - Docs

修改data/gitea/conf/app.ini, 增加如下内容

1
2
3
[attachment]
PATH = /data/gitea/attachments
MAX_SIZE=100

搞定啦🎉

Webhook无法调用企微机器人

🆕2023-03-20

报错截图

Config Cheat Sheet - Docs

修改data/gitea/conf/app.ini, 增加/修改[webhook]下的内容

1
2
3
[webhook]
ALLOWED_HOST_LIST=loopback,private,*.example.com,qyapi.weixin.qq.com
DELIVER_TIMEOUT=20

修改后重启容器, 点击推送👉🏻的重试按钮🔄, 如下图, 可以收到推送🚀

重试按钮
收到推送

Drone

解决报错: linter: untrusted repositories cannot mount host volumes

无法挂载宿主机磁盘

需要使用管理员账号登录Drone, 并为当前项目用户添加管理员权限, 否则无法设置项目信任

drone untrusted repositories cannot mount host volumes解决方案_StarJava_的博客-CSDN博客_drone volumes

Drone SETTINGS 页面没有 Trusted_StarJava_的博客-CSDN博客

普通用户无权信任项目
管理员用户可添加信任

无法Clone包含子模块的项目

Cloning | Drone

1
2
3
4
5
6
7
8
9
10
11
12
13
14
15
kind: pipeline
type: docker
name: default

steps:
- name: submodules
image: alpine/git
commands:
- git submodule update --init --recursive

- name: build
image: golang
commands:
- go build
- go test

官方提供命令, 需要先执行git submodule update --init --recursive


  1. 使用 Docker 安装 - Docs↩︎

  2. 这里是指官方支持多种数据库, 如MySQL/PostgreSQL/SQLite3等常用数据库支持↩︎

  3. Drone 用户详细注册说明: Registration | Drone↩︎

  4. Drone管理员详细说明: Administrators | Drone↩︎

  5. Drone环境变量预创建用户详细说明: DRONE_USER_CREATE | Drone↩︎

  6. Gitea Webhook 详细说明: Config Cheat Sheet - Docs↩︎

  7. Gitea Webhook 详细说明: Config Cheat Sheet - Docs↩︎

  8. Gieta Migrations 详细说明: Config Cheat Sheet - Docs↩︎

  9. Gitea Server 详细说明: Config Cheat Sheet - Docs↩︎